1. Synchronize your calendar with your instructional rotation.
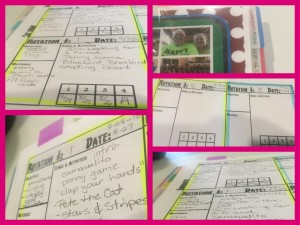
Your schedule will vary significantly depending on how often you see your students. In my 16 years of teaching I have taught within a variety of rotations including a 3 day rotation, a 4 day rotation, a 6 day rotation. I currently teach with a 4 day rotation. The first thing I do when I get my school calendar is write little numbers 1-4 in the corner of each school day. Then I can figure out how many rotations or lessons I will have to plan each semester. When you take this first step, watch out for school holidays, teacher in-service and testing days. Some schools choose to cancel music class on testing days, others don’t. There are other special days when music is canceled for everyone. Your team leader or your principal can let you know if you must skip a class on those days or if the schedule just picks up where you left off. For example, my school doesn’t have music on field day. So if “day 2” was supposed to come to music on Field Day, then they just come to music the day after instead. I typically teach 15-16 rotations in the fall and 16-17 rotations in the spring and have included a little square in the corner of each day so that I can jot down who i teach on a given day. The chart that I use is in my planner. I printed it and had it spiral bound. When I look at my kindergarten row I can see 4 rotations at once.
2. Start with the first day
Procedures, movement activities, name games, more games, music literacy review, picture books and more procedures. After Road Mapping you will want to take the time to write good lesson plans, but not now… Now just write down a grocery list of things you want to include or sudden inspiration that you don’t want to forget. If you already know where to find a resource, great! However, if you don’t know, or if you need to create it, it might be a good idea to highlight what is needed in yellow so you won’t forget that it doesn’t exist. Although this isn’t a lesson plan, try not to get caught in the trap of writing one word for each grade level…. Although the lessons I will ultimately plan for the first day of school could certainly be summarized as “First Day Procedures” if that is all I write down for rotation one, I will miss out on an opportunity to brainstorm. After all, first day of kinder doesn’t look anything like first day of 2nd grade or 5th grade and yours won’t either. Road maps are a great place to start figuring out HOW each grade level will be different even when you are teaching similar standards in more than one grade level.
3. Squeeze your curriculum into your road map
Using either your district scope and sequence or your national or state standards, it’s time to begin placing concepts into your road map. I include objectives, songs and activities and materials. If you need ideas about how to teach a particular objective I highly recommend using, music blogs, Pinterest, Google, and Youtube. If you an get into your new school, go raid the closet and either plan in your new classroom without A/C OR ask if you can take some of the materials home to study. This is one of those times that all of the Kodaly and Orff training will really pay off because even if you have nothing else, you know where to start. I typically end up starting with kindergarten because there are fewer standards and starting with the simple ideas sort of warms up my brain for summer. Remember to review last years material at the beginning of the year. Building in time to assess and review concepts that should have been learned last year is critical when you are new to a school because you can’t assume that the students remember what should have been taught last year.
4. Consider your day across grade levels
It would probably be best if you avoided a day that includes barred instruments with kinder, risers with 3rd and square dancing with 5th, especially if those classes happen immediately following one another. While quick changes are often necessary and keep us teachers from getting bored or “ear-weary”, road mapping offers an opportunity to look at your day as a whole and plan it so that you can get through it with a smile rather than a grimace. Do you have time in your schedule to make a quick switch? OR, would it be best for you to group your days so that there are times when more than one grade level can use the same resources? I don’t keep the risers in my room, so when it’s time for the 3rd grade to start using them , I schedule time to teach my kindergarten students how to be on them safely and then we choose activities that are not complicated by the risers.
5. Accommodate for performances
My 3rd graders perform in November. Depending on how often you see your students in can take anywhere from one to two months to prepare and execute a performance. Because my 3rd graders always perform in November, we are able to anticipate this and add some 3rd grade concepts to the end of 2nd grade. Also, at the beginning of 3rd grade we make sure that even our first day of school activities are slightly accelerated and we work hard to ensure that our performances are curricular rich so that when our 3rd graders come back after their Thanksgiving holiday they are ready to finish out the first semester well and truly prepared for 3rd grade music in January. Our performances are on Thursdays and our teammates who teach PE and Art are gracious enough to give us Monday-Wednesday to do full grade level rehearsals. How much time is needed for full grade level rehearsals is entirely dependent upon access to the stage and the complexity of the performance. You may need anywhere from 3-5 days with the entire grade level. In my road map for a grade level that has a performance I include when each song will be introduced, when each will be choreographed (if needed), when auditions for speaking parts will occur, when costumes will be sized by volunteers, when everything will be memorized and when the grade level rehearsals will occur. There is even a day when we take a few minutes to assign a place on the risers for each child.
If you would like a copy of my performance planner you can download it for free HERE
Another thing I do to ensure that I have space in my brain left over for preparing for each performance is that I intentionally plan low key composer study, listening lessons for each grade level who is not performing the week before and the week of the performance. Find something, anything, centers, composing with ipads, rhythm scavenger hunts… the history of jazz, whatever, that is easy that also has solid instructional integrity for those weeks. I choose composer study and listening skills for those rotations. Trust me, those will be the weeks when you are most distracted by your “to-do” list, are most likely to have administration stop by and most tempted to just throw in the towel and put on a video…. Don’t do it! Plan well and teach your 5th graders to adore Bach while you have volunteers sorting props in the back of the room and a parent on the phone with an emergency. Plus, if you get pulled from your room because the custodian has a question about the chairs, your door neighbor can keep an eye on your engaged students. You can do it and do it well IF you have a plan! It starts with a road map!
6. Like Peanut Butter and Jelly
As you go through your curriculum and place it on your road map, you will start having to make decisions. You may notice that there aren’t enough lessons in your schedule to give a dedicated day to each of your objectives. This is when planning gets fun! Brainstorm ways of combining objectives creatively. Songs are not made up of only one element of music, and neither should our lessons. Make room in your road map to spiral, review, apply, assess, and label everything that you are doing. Your students may be ready to assess dynamics and be introduced to tempo on the same day. Additionally, in order to keep my students engage and to reinforce skills that need daily practice I try to include a singing name game, a singing gross motor game , a music listening / movement, playing instruments, music reading and writing in every lesson. I may skip one here or there but I fit in as many as possible no matter what the lesson. I am also intentional about integrating other subject areas into my teaching technology, language arts, math, social studies and science are all included in my road map wherever I can anticipate that they would be a good fit. The road map keeps me on track with things might slip under the radar and my students would loose out.
7. Pacing is Everything
As a new teacher I think it would be FANTASTIC to have all of the objectives and idea about what you’d like to teach all laid out before the first day of school. However, especially this year it might be wise to make a few short term goals. First try to road map just for the first grading period 6-9 weeks. If your district has laid out a clear scope and sequence for you, then it’s easier, but I promise, even if you find yourself in a situation where you are starting from scratch, the investment that you give today in really digging into the standards and figuring out what to teach will pay off in huge ways for your students AND this process will get easier. I promise! If you choose to only look ahead 9 weeks, plan on sitting down with your road map kit and cup of coffee every 4 weeks or every time progress reports go home. One advantage to this plan would be that your road map would be based on the reality of the students you are teaching rather than the students you thought you would have. Believe me, By the third week of school you will know tons and tons and tons more about what you are doing than you do right now.
8. Use it!
If you don’t use it, then you will miss out on a great tool! Use it to stay 3 weeks ahead on your lesson plans. Use it to keep track of what materials you need to gather and create for upcoming lessons. Use it to keep track of who has been taught what. – Those 4 squares with the 1,2,3,4 on my template are for exactly that. I write down the date of when I teach the lesson mentioned. When I was a young teacher, the art teacher at my school kept a tracking chart by her desk. She would write down the progress that each class made on a given lesson so that when they came back she would know where they were in the lesson. When you teach the same lesson to multiple classes, it is very easy to loose track of what you have done and what you’ve missed. If you look closely at the pictures I’ve included in this post, you’ll noticed that under the number 4 I wrote FD. That is because I know that on that day there will be fire drill during first grade. I also know that there will be an assembly on that day so I wrote the letter A instead of the date. That tells me that I need to fit in that first lesson with my 1st and 2nd grade classes on Day 4.


